

Móc vòng đời Vue
Lifecycle Hook trong Vue là các giai đoạn nhất định trong vòng đời của một thành phần nơi chúng ta có thể thêm mã để thực hiện mọi việc.
Móc vòng đời
Mỗi khi một thành phần đạt đến một giai đoạn mới trong vòng đời của nó, một hàm cụ thể sẽ chạy và chúng ta có thể thêm mã vào hàm đó. Những hàm như vậy được gọi là móc vòng đời, vì chúng ta có thể "nối" mã của mình vào giai đoạn đó.
Đây là tất cả các hook vòng đời mà một thành phần có:
-
beforeCreate -
created -
beforeMount -
mounted -
beforeUpdate -
updated -
beforeUnmount -
unmounted -
errorCaptured -
renderTracked -
renderTriggered -
activated -
deactivated -
serverPrefetch
Dưới đây là ví dụ về các móc vòng đời này.
Móc 'trướcTạo'
Móc vòng đời beforeCreate xảy ra trước khi thành phần được khởi tạo, vì vậy đây là trước khi Vue thiết lập dữ liệu, thuộc tính được tính toán, phương thức và trình xử lý sự kiện của thành phần.
Ví dụ, hook beforeCreate có thể được sử dụng để thiết lập trình xử lý sự kiện toàn cầu, nhưng chúng ta nên tránh cố gắng truy cập các phần tử thuộc về thành phần từ hook vòng đời beforeCreate , chẳng hạn như dữ liệu, trình theo dõi và phương thức, vì chúng chưa được tạo tại sân khấu này.
Ngoài ra, sẽ không có ý nghĩa gì khi cố gắng truy cập các phần tử DOM từ hook vòng đời beforeCreate , vì chúng không được tạo cho đến sau khi thành phần được mounted .
Ví dụ
CompOne.vue :
 <template>
    <h2>Component</h2>
    <p>This is the component</p>
    <p id="pResult">{{ text }}</p>
</template>

<script>
export default {
	data() {
		return {
			text: '...'
		}
	},
  beforeCreate() {
		this.text = 'initial text'; // This line has no effect
    console.log("beforeCreate: The component is not created yet.");
  }
}
</script>
App.vue :
 <template>
  <h1>The 'beforeCreate' Lifecycle Hook</h1>
  <p>We can see the console.log() message from 'beforeCreate' lifecycle hook, but there is no effect from the text change we try to do to the Vue data property, because the Vue data property is not created yet.</p>
  <button @click="this.activeComp = !this.activeComp">Add/Remove Component</button>
  <div>
    <comp-one v-if="activeComp"></comp-one>
  </div>
</template>

<script>
export default {
  data() {
    return {
      activeComp: false
    }
  }
}
</script>

<style>
#app > div {
  border: dashed black 1px;
  border-radius: 10px;
  padding: 10px;
  margin-top: 10px;
  background-color: lightgreen;
}
#pResult {
  background-color: lightcoral;
  display: inline-block;
}
</style>
Chạy ví dụ » Trong ví dụ trên, dòng 15 trong CompOne.vue không có tác dụng vì trong dòng đó chúng ta cố gắng thay đổi văn bản bên trong thuộc tính dữ liệu Vue, nhưng thuộc tính dữ liệu Vue thực sự chưa được tạo. Ngoài ra, hãy nhớ mở bảng điều khiển trình duyệt để xem kết quả của lệnh gọi console.log() trên dòng 16.
Hook 'được tạo'
Móc vòng đời created xảy ra sau khi thành phần được khởi tạo, vì vậy Vue đã thiết lập dữ liệu, thuộc tính được tính toán, phương thức và trình xử lý sự kiện của thành phần đó.
Chúng ta nên tránh cố gắng truy cập các phần tử DOM từ hook vòng đời created , vì các phần tử DOM không thể truy cập được cho đến khi thành phần đó được mounted .
Móc vòng đời created có thể được sử dụng để tìm nạp dữ liệu bằng các yêu cầu HTTP hoặc thiết lập các giá trị dữ liệu ban đầu. Giống như trong ví dụ bên dưới, thuộc tính dữ liệu 'văn bản' được cấp một giá trị ban đầu:
Ví dụ
CompOne.vue :
 <template>
    <h2>Component</h2>
    <p>This is the component</p>
    <p id="pResult">{{ text }}</p>
</template>

<script>
export default {
	data() {
		return {
			text: '...'
		}
	},
  created() {
		this.text = 'initial text';
    console.log("created: The component just got created.");
  }
}
</script>
App.vue :
 <template>
  <h1>The 'created' Lifecycle Hook</h1>
  <p>We can see the console.log() message from 'created' lifecycle hook, and the text change we try to do to the Vue data property works, because the Vue data property is already created at this stage.</p>
  <button @click="this.activeComp = !this.activeComp">Add/Remove Component</button>
  <div>
    <comp-one v-if="activeComp"></comp-one>
  </div>
</template>

<script>
export default {
  data() {
    return {
      activeComp: false
    }
  }
}
</script>

<style>
#app > div {
  border: dashed black 1px;
  border-radius: 10px;
  padding: 10px;
  margin-top: 10px;
  background-color: lightgreen;
}
#pResult {
  background-color: lightcoral;
  display: inline-block;
}
</style>
Chạy ví dụ »Móc 'trướcMount'
Móc vòng đời beforeMount xảy ra ngay trước khi thành phần được mounted , tức là ngay trước khi thành phần đó được thêm vào DOM.
Chúng ta nên tránh cố gắng truy cập các phần tử DOM từ hook vòng đời beforeMount , vì các phần tử DOM không thể truy cập được cho đến khi thành phần đó được mounted .
Ví dụ bên dưới cho thấy chúng ta chưa thể truy cập các phần tử DOM trong thành phần, dòng 11 trong CompOne.vue không hoạt động và tạo ra lỗi trong bảng điều khiển trình duyệt:
Ví dụ
CompOne.vue :
 <template>
    <h2>Component</h2>
    <p>This is the component</p>
    <p ref="pEl" id="pEl">We try to access this text from the 'beforeMount' hook.</p>
</template>

<script>
export default {
  beforeMount() {
    console.log("beforeMount: This is just before the component is mounted.");
    this.$refs.pEl.innerHTML = "Hello World!"; // <-- We cannot reach the 'pEl' DOM element at this stage
  }
}
</script>
App.vue :
 <template>
  <h1>The 'beforeMount' Lifecycle Hook</h1>
  <p>We can see the console.log() message from the 'beforeMount' lifecycle hook, but the text change we try to do to the 'pEl' paragraph DOM element does not work, because the 'pEl' paragraph DOM element does not exist yet at this stage.</p>
  <button @click="this.activeComp = !this.activeComp">Add/Remove Component</button>
  <div>
    <comp-one v-if="activeComp"></comp-one>
  </div>
</template>

<script>
export default {
  data() {
    return {
      activeComp: false
    }
  }
}
</script>

<style>
#app > div {
  border: dashed black 1px;
  border-radius: 10px;
  padding: 10px;
  margin-top: 10px;
  background-color: lightgreen;
}
#pEl {
  background-color: lightcoral;
  display: inline-block;
}
</style>
Chạy ví dụ »Móc 'được gắn'
Ngay sau khi một thành phần được thêm vào cây DOM, hàm mounted() sẽ được gọi và chúng ta có thể thêm mã của mình vào giai đoạn đó.
Đây là cơ hội đầu tiên chúng ta phải thực hiện những việc liên quan đến các phần tử DOM thuộc về thành phần đó, như sử dụng thuộc tính ref và đối tượng $refs , như chúng ta làm trong ví dụ thứ hai bên dưới.
Ví dụ
CompOne.vue :
 <template>
  <h2>Component</h2>
  <p>Right after this component is added to the DOM, the mounted() function is called and we can add code to that mounted() function. In this example, an alert popup box appears after this component is mounted.</p>
  <p><strong>Note:</strong> The reason that the alert is visible before the component is visible is because the alert is called before the browser gets to render the component to the screen.</p>
</template>

<script>
export default {
  mounted() {
    alert("The component is mounted!");
  }
}
</script>
App.vue :
 <template>
  <h1>The 'mounted' Lifecycle Hook</h1>
  <button @click="this.activeComp = !this.activeComp">Create component</button>
  <div>
    <comp-one v-if="activeComp"></comp-one>
  </div>
</template>

<script>
export default {
  data() {
    return {
      activeComp: false
    }
  }
}
</script>

<style scoped>
  div {
    border: dashed black 1px;
    border-radius: 10px;
    padding: 20px;
    margin: 10px;
    width: 400px;
    background-color: lightgreen;
  }
</style>
Chạy ví dụ » Lưu ý: Giai đoạn mounted xảy ra SAU KHI thành phần được thêm vào DOM, nhưng trong ví dụ trên, alert() hiển thị TRƯỚC KHI chúng ta nhìn thấy thành phần đó. Lý do cho điều này là vì thành phần đầu tiên được thêm vào DOM, nhưng trước khi trình duyệt hiển thị thành phần đó ra màn hình, giai đoạn mounted sẽ diễn ra và alert() sẽ hiển thị và tạm dừng trình duyệt hiển thị thành phần đó.
Dưới đây là một ví dụ có lẽ hữu ích hơn: Để đặt con trỏ vào trường nhập sau khi thành phần biểu mẫu được gắn kết, để người dùng có thể bắt đầu nhập.
Ví dụ
CompOne.vue :
 <template>
  <h2>Form Component</h2>
  <p>When this component is added to the DOM tree, the mounted() function is called, and we put the cursor inside the input element.</p>
  <form @submit.prevent>
    <label>
      <p>
        Name: <br>
        <input type="text" ref="inpName">
      </p>
    </label>
    <label>
      <p>
        Age: <br>
        <input type="number">
      </p>
    </label>
    <button>Submit</button>
  </form>
  <p>(This form does not work, it is only here to show the mounted lifecycle hook.)</p>
</template>

<script>
  export default {
    mounted() {
      this.$refs.inpName.focus();
    }
  }
</script>
Chạy ví dụ »Móc 'trướcUpdate'
Móc vòng đời beforeUpdate được gọi bất cứ khi nào có thay đổi trong dữ liệu của thành phần của chúng tôi, nhưng trước khi bản cập nhật được hiển thị trên màn hình. Móc vòng đời beforeUpdate xảy ra ngay trước móc vòng đời updated .
Điều đặc biệt ở hook beforeUpdate là chúng ta có thể thực hiện các thay đổi đối với ứng dụng mà không cần nó kích hoạt bản cập nhật mới, vì vậy chúng ta tránh được vòng lặp vô hạn. Đó là lý do không thực hiện các thay đổi đối với ứng dụng trong lifecycle hook updated , vì với hook đó, một vòng lặp vô hạn sẽ được tạo ra. Chỉ cần nhìn vào ví dụ thứ ba bên dưới, màu đỏ.
Ví dụ
Hàm beforeUpdate() thêm thẻ <li> vào tài liệu để cho biết rằng hàm beforeUpdate() đã chạy.
CompOne.vue :
 <template>
  <h2>Component</h2>
  <p>This is the component</p>
</template>
App.vue :
 <template>
  <h1>The 'beforeUpdate' Lifecycle Hook</h1>
  <p>Whenever there is a change in our page, the application is 'updated' and the 'beforeUpdate' hook happens just before that.</p>
  <p>It is safe to modify our page in the 'beforeUpdate' hook like we do here, but if we modify our page in the 'updated' hook, we will generate an infinite loop.</p>
  <button @click="this.activeComp = !this.activeComp">Add/Remove Component</button>
  <div>
    <comp-one v-if="activeComp"></comp-one>
  </div>
  <ol ref="divLog"></ol>
</template>

<script>
export default {
  data() {
    return {
      activeComp: true
    }
  },
  beforeUpdate() {
    this.$refs.divLog.innerHTML += "<li>beforeUpdate: This happened just before the 'updated' hook.</li>";
  }
}
</script>

<style>
#app > div {
  border: dashed black 1px;
  border-radius: 10px;
  padding: 10px;
  margin-top: 10px;
  background-color: lightgreen;
}
</style>
Chạy ví dụ »Hook 'cập nhật'
Móc vòng đời updated được gọi sau khi thành phần của chúng tôi cập nhật cây DOM của nó.
Ví dụ
Hàm updated() viết tin nhắn bằng console.log() . Điều này xảy ra bất cứ khi nào trang được cập nhật, trong ví dụ này là mỗi khi thành phần được thêm hoặc xóa.
CompOne.vue :
 <template>
  <h2>Component</h2>
  <p>This is the component</p>
</template>
App.vue :
 <template>
  <h1>The 'updated' Lifecycle Hook</h1>
  <p>Whenever there is a change in our page, the application is updated and the updated() function is called. In this example we use console.log() in the updated() function that runs when our application is updated.</p>
  <button @click="this.activeComp = !this.activeComp">Add/Remove Component</button>
  <div>
    <comp-one v-if="activeComp"></comp-one>
  </div>
</template>

<script>
export default {
  data() {
    return {
      activeComp: true
    }
  },
  updated() {
    console.log("The component is updated!");
  }
}
</script>

<style>
#app {
  max-width: 450px;
}
#app > div {
  border: dashed black 1px;
  border-radius: 10px;
  padding: 10px;
  margin-top: 10px;
  width: 80%;
  background-color: lightgreen;
}
</style>
Chạy ví dụ »Chúng ta có thể thấy kết quả trong bảng điều khiển trình duyệt sau khi nhấp vào nút "Thêm/Xóa thành phần" 10 lần:

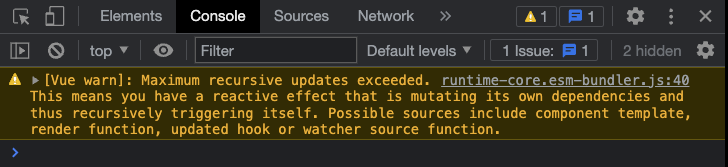
Lưu ý: Chúng ta phải cẩn thận để không sửa đổi chính trang đó khi hook vòng đời updated được gọi, vì khi đó trang sẽ cập nhật đi cập nhật lại, tạo ra một vòng lặp vô hạn.
Hãy thử xem điều gì sẽ xảy ra nếu chúng ta làm chính xác như lưu ý ở trên đã cảnh báo chúng ta. Trang sẽ cập nhật vô thời hạn?:
Ví dụ
Hàm updated() thêm văn bản vào một đoạn văn, từ đó cập nhật lại trang và hàm này chạy đi chạy lại trong một vòng lặp vô hạn. May mắn thay, cuối cùng trình duyệt của bạn sẽ dừng vòng lặp này.
CompOne.vue :
 <template>
  <h2>Component</h2>
  <p>This is the component</p>
</template>
App.vue :
 <template>
  <h1>The 'updated' Lifecycle Hook</h1>
  <p>Whenever there is a change in our page, the application is updated and the updated() function is called.</p>
  <p>The first change that causes the updated hook to be called is when we remove the component by clicking the button. When this happens, the update() function adds text to the last paragraph, which in turn updates the page again and again.</p>
  <button @click="this.activeComp = !this.activeComp">Add/Remove Component</button>
  <div>
    <comp-one v-if="activeComp"></comp-one>
  </div>
  <div>{{ text }}</div>
</template>

<script>
export default {
  data() {
    return {
      activeComp: true,
      text: "Hello, "
    }
  },
  updated() {
    this.text += "hi, ";
  }
}
</script>

<style>
#app {
  max-width: 450px;
}
#app > div {
  border: dashed black 1px;
  border-radius: 10px;
  padding: 10px;
  margin-top: 10px;
  width: 80%;
  background-color: lightgreen;
}
</style>
Chạy ví dụ »Khi chạy mã ở trên cục bộ trên máy của bạn ở chế độ nhà phát triển, cảnh báo bảng điều khiển trình duyệt Chrome trông như thế này:
Móc 'trướcUnmount'
Móc vòng đời beforeUnmount được gọi ngay trước khi một thành phần bị xóa khỏi DOM.
Như có thể thấy trong ví dụ bên dưới, chúng ta vẫn có thể truy cập các phần tử thành phần trong DOM bằng hook beforeUnmount .
Ví dụ
CompOne.vue :
 <template>
  <h2>Component</h2>
  <p ref="pEl">Strawberries!</p>
</template>

<script>
export default {
  beforeUnmount() {
    alert("beforeUnmount: The text inside the p-tag is: " + this.$refs.pEl.innerHTML);
  }
}
</script>
App.vue :
 <template>
  <h1>Lifecycle Hooks</h1>
  <button @click="this.activeComp = !this.activeComp">{{ btnText }}</button>
  <div>
    <comp-one v-if="activeComp"></comp-one>
  </div>
</template>

<script>
export default {
  data() {
    return {
      activeComp: true
    }
  },
  computed: {
    btnText() {
      if(this.activeComp) {
        return 'Remove component'
      }
      else {
        return 'Add component'
      }
    }
  }
}
</script>

<style scoped>
  div {
    border: dashed black 1px;
    border-radius: 10px;
    padding: 20px;
    margin: 10px;
    width: 400px;
    background-color: lightgreen;
  }
</style>
Chạy ví dụ »Cái móc 'không thể gắn kết'
Móc vòng đời unmounted được gọi sau khi một thành phần bị xóa khỏi DOM.
Ví dụ, hook này có thể được sử dụng để loại bỏ trình xử lý sự kiện hoặc hủy bộ tính giờ hoặc khoảng thời gian.
Khi một thành phần được unmounted , hàm unmounted() sẽ được gọi và chúng ta có thể thêm mã của mình vào đó:
Ví dụ
CompOne.vue :
 <template>
  <h2>Component</h2>
  <p>When this component is removed from the DOM tree, the unmounted() function is called and we can add code to that function. In this example we create an alert popup box when this component is removed.</p>
</template>

<script>
export default {
  unmounted() {
    alert("The component is removed (unmounted)!");
  }
}
</script>
App.vue :
 <template>
  <h1>Lifecycle Hooks</h1>
  <button @click="this.activeComp = !this.activeComp">{{ btnText }}</button>
  <div>
    <comp-one v-if="activeComp"></comp-one>
  </div>
</template>

<script>
export default {
  data() {
    return {
      activeComp: true
    }
  },
  computed: {
    btnText() {
      if(this.activeComp) {
        return 'Remove component'
      }
      else {
        return 'Add component'
      }
    }
  }
}
</script>

<style scoped>
  div {
    border: dashed black 1px;
    border-radius: 10px;
    padding: 20px;
    margin: 10px;
    width: 400px;
    background-color: lightgreen;
  }
</style>
Chạy ví dụ » Lưu ý: Giai đoạn unmounted xảy ra SAU KHI thành phần bị xóa khỏi DOM, nhưng trong ví dụ trên, alert() hiển thị TRƯỚC KHI thành phần biến mất. Lý do cho điều này là vì thành phần đầu tiên bị xóa khỏi DOM, nhưng trước khi trình duyệt hiển thị việc xóa thành phần đó ra màn hình, giai đoạn unmounted sẽ xảy ra và alert() sẽ hiển thị và tạm dừng trình duyệt xóa rõ ràng thành phần đó. thành phần.
Hook 'lỗi bị bắt'
Móc vòng đời errorCaptured được gọi khi xảy ra lỗi trong thành phần con/thành phần con cháu.
Móc này có thể được sử dụng để xử lý lỗi, ghi nhật ký hoặc hiển thị lỗi cho người dùng.
Ví dụ
CompOne.vue :
 <template>
  <h2>Component</h2>
  <p>This is the component</p>
  <button @click="generateError">Generate Error</button>
</template>

<script>
export default {
  methods: {
    generateError() {
      this.$refs.objEl.innerHTML = "hi";
    }
  }
}
</script>
App.vue :
 <template>
  <h1>The 'errorCaptured' Lifecycle Hook</h1>
  <p>Whenever there is an error in a child component, the errorCaptured() function is called on the parent.</p>
  <p>When the button inside the component is clicked, a method will run that tries to do changes to a $refs object that does not exist. This creates an error in the component that triggers the 'errorCaptured' lifecycle hook in the parent, and an alert box is displayed with information about the error.</p>
  <p>After clicking "Ok" in the alert box you can see the error in the browser console.</p>
  <div>
    <comp-one></comp-one>
  </div>
</template>

<script>
export default {
  errorCaptured() {
    alert("An error occurred");
  }
}
</script>

<style>
#app > div {
  border: dashed black 1px;
  border-radius: 10px;
  padding: 10px;
  margin-top: 10px;
  background-color: lightgreen;
}
</style>
Chạy ví dụ » Thông tin về lỗi cũng có thể được ghi lại dưới dạng đối số cho hàm errorCaptured() và các đối số này là:
- lỗi
- thành phần gây ra lỗi
- loại nguồn lỗi
Trong ví dụ bên dưới, các đối số này được ghi lại trong hàm errorCaptured() và được ghi vào bảng điều khiển:
Ví dụ
CompOne.vue :
 <template>
  <h2>Component</h2>
  <p>This is the component</p>
  <button @click="generateError">Generate Error</button>
</template>

<script>
export default {
  methods: {
    generateError() {
      this.$refs.objEl.innerHTML = "hi";
    }
  }
}
</script>
App.vue :
 <template>
  <h1>The 'errorCaptured' Lifecycle Hook</h1>
  <p>Whenever there is an error in a child component, the errorCaptured() function is called on the parent.</p>
  <p>Open the browser console to see the captured error details.</p>
  <div>
    <comp-one></comp-one>
  </div>
</template>

<script>
export default {
  errorCaptured(error,compInst,errorInfo) {
    console.log("error: ", error);
    console.log("compInst: ", compInst);
    console.log("errorInfo: ", errorInfo);
  }
}
</script>

<style>
#app > div {
  border: dashed black 1px;
  border-radius: 10px;
  padding: 10px;
  margin-top: 10px;
  background-color: lightgreen;
}
</style>
Chạy ví dụ »Móc vòng đời 'renderTracked' và 'renderTriggered'
hook renderTracked chạy khi chức năng kết xuất được đặt để theo dõi hoặc giám sát một thành phần phản ứng. hook renderTracked thường chạy khi thành phần phản ứng được khởi tạo.
Móc renderTriggered chạy khi thành phần phản ứng được theo dõi thay đổi và do đó kích hoạt một kết xuất mới để màn hình được cập nhật những thay đổi mới nhất.
Thành phần phản ứng là thành phần có thể thay đổi.
Hàm kết xuất là một hàm do Vue biên soạn để theo dõi các thành phần phản ứng. Khi một thành phần phản ứng thay đổi, chức năng kết xuất sẽ được kích hoạt và hiển thị lại ứng dụng ra màn hình.
Các hook renderTracked và renderTriggered được sử dụng để gỡ lỗi và chỉ khả dụng trong chế độ phát triển.
Để xem alert() và console.log() từ các hook renderTracked và renderTriggered , bạn phải sao chép mã trong ví dụ bên dưới vào máy tính của mình và chạy ứng dụng ở chế độ phát triển.
Ví dụ
CompOne.vue :
 <template>
  <h2>Component One</h2>
  <p>This is a component.</p>
  <button @click="counter++">Add One</button>
  <p>{{ counter }}</p>
</template>

<script>
export default {
  data() {
    return {
      counter: 0
    }
  },
  renderTracked(evt) {
    console.log("renderTracked: ",evt);
    alert("renderTracked");
  },
  renderTriggered(evt) {
    console.log("renderTriggered: ",evt)
    alert("renderTriggered");
  }
}
</script>
App.vue :
 <template>
  <h1>The 'renderTracked' and 'renderTriggered' Lifecycle Hooks</h1>
  <p>The 'renderTracked' and 'renderTriggered' lifecycle hooks are used for debugging.</p>
  <p><mark>This example only works in development mode, so to see the hooks run, you must copy this code and run it on you own computer in development mode.</mark></p>
  <div>
    <comp-one></comp-one>
  </div>
</template>

<style scoped>
  div {
    border: dashed black 1px;
    border-radius: 10px;
    padding: 20px;
    margin-top: 10px;
    background-color: lightgreen;
  }
</style>
Chạy ví dụ » Lưu ý: Mã trong ví dụ trên nhằm mục đích sao chép và chạy cục bộ trên máy tính của bạn ở chế độ phát triển, vì các hook renderTracked và renderTriggered chỉ hoạt động ở chế độ phát triển.
Móc vòng đời 'đã kích hoạt' và 'đã hủy kích hoạt'
Như chúng ta có thể thấy ở trên trên trang này, chúng ta có các móc vòng đời mounted và unmounted khi một thành phần bị xóa hoặc thêm vào DOM.
Các móc vòng đời activated và deactivated chỉ dành cho khi một thành phần động được lưu trong bộ nhớ đệm được thêm vào hoặc xóa chứ không phải khỏi DOM. Thẻ <KeepAlive> được sử dụng trong ví dụ bên dưới để lưu trữ thành phần động.
Ví dụ
CompOne.vue :
 <template>
  <h2>Component</h2>
  <p>Below is a log with every time the 'mounted' or 'activated' hooks run.</p>
  <ol ref="olEl"></ol>
  <p>You can also see when these hooks run in the console.</p>
</template>

<script>
export default {
  mounted() {
    console.log("mounted");
    const liEl = document.createElement("li");
    liEl.innerHTML = "mounted";
    this.$refs.olEl.appendChild(liEl);
  },
  activated() {
    console.log("activated");
    const liEl = document.createElement("li");
    liEl.innerHTML = "activated";
    this.$refs.olEl.appendChild(liEl);
  }
}
</script>

<style>
  li {
    background-color: lightcoral;
    width: 5em;
  }
</style>
App.vue :
 <template>
  <h1>The 'activated' Lifecycle Hook</h1>
  <p>In this example for the 'activated' hook we check if the component is cached properly with <KeepAlive>.</p>
  <p>If the component is cached properly with <KeepAlive> we expect the 'mounted' hook to run once the first time the component is included (must be added to the DOM the first time), and we expect the 'activated' hook to run every time the component is included (also the first time).</p>
  <button @click="this.activeComp = !this.activeComp">Include component</button>
  <div>
    <KeepAlive>
      <comp-one v-if="activeComp"></comp-one>
    </KeepAlive>
  </div>
</template>

<script>
export default {
  data() {
    return {
      activeComp: false
    }
  }
}
</script>

<style scoped>
  div {
    border: dashed black 1px;
    border-radius: 10px;
    padding: 20px;
    margin-top: 10px;
    background-color: lightgreen;
  }
</style>
Chạy ví dụ » Hãy mở rộng ví dụ trên để xem cách hoạt động của cả hook activated và deactivated . Chúng ta cũng hãy sử dụng các hook mounted và unmounted để có thể thấy rằng hook mounted sẽ chạy khi thành phần được lưu trong bộ nhớ đệm lần đầu tiên được thêm vào và hook unmounted không bao giờ chạy đối với thành phần được lưu trong bộ nhớ đệm.
Ví dụ
CompOne.vue :
 <template>
  <h2>Component</h2>
  <p>Below is a log with every time the 'activated', 'deactivated', 'mounted' or 'unmounted' hooks run.</p>
  <ol ref="olEl"></ol>
  <p>You can also see when these hooks run in the console.</p>
</template>

<script>
export default {
  mounted() {
    this.logHook("mounted");
  },
  unmounted() {
    this.logHook("unmounted");
  },
  activated() {
    this.logHook("activated");
  },
  deactivated() {
    this.logHook("deactivated");
  },
  methods: {
    logHook(hookName) {
      console.log(hookName);
      const liEl = document.createElement("li");
      liEl.innerHTML = hookName;
      this.$refs.olEl.appendChild(liEl);
    }
  }
}
</script>

<style>
  li {
    background-color: lightcoral;
    width: 5em;
  }
</style>
App.vue :
 <template>
  <h1>The 'activated' and 'deactivated' Lifecycle Hooks</h1>
  <p>In this example for the 'activated' and 'deactivated' hooks we also see when and if the 'mounted' and 'unmounted' hooks are run.</p>
  <button @click="this.activeComp = !this.activeComp">Include component</button>
  <div>
    <KeepAlive>
      <comp-one v-if="activeComp"></comp-one>
    </KeepAlive>
  </div>
</template>

<script>
export default {
  data() {
    return {
      activeComp: false
    }
  }
}
</script>

<style scoped>
  div {
    border: dashed black 1px;
    border-radius: 10px;
    padding: 20px;
    margin-top: 10px;
    background-color: lightgreen;
  }
</style>
Chạy ví dụ »Móc vòng đời 'serverPrefetch'
Móc 'serverPrefetch' chỉ được gọi trong quá trình kết xuất phía máy chủ (SSR).
Việc giải thích và tạo một ví dụ cho hook 'serverPrefetch' sẽ yêu cầu phần giới thiệu và thiết lập tương đối dài và điều đó nằm ngoài phạm vi của hướng dẫn này.
